How to declutter your WordPress admin
Customize the dashboard and clean up the backend
The WordPress admin section is pretty comprehensible by default. Its user-friendliness made it to one of the most popular CMS systems out there. Nevertheless, a lot of functionalities and features can be overwhelming, especially because you won’t use each and everyone of them. For your convenience, it can be helpful to declutter your WordPress admin. If you ever make a website for a client with WordPress, some customization will come in handy if you offer some extra tailor-made features.
We will show these examples using a WordPress 4.7 installation with the Twenty Sixteen theme activated. However, the code samples should work on any WordPress them out there. We will be making changes to the functions.php-file, so you will need access to your theme files as well, be it through an FTP-connection or on a local device. Also note this has nothing to do with user roles or editing permissions. If you want to alter things in that respect, there are a lot of decent plugins out there with User Role Editor being one of my favourites.
Disable the default metaboxes on the WordPress dashboard
When you first log in to your WordPress backend after af fresh install, you see the default dashboard.
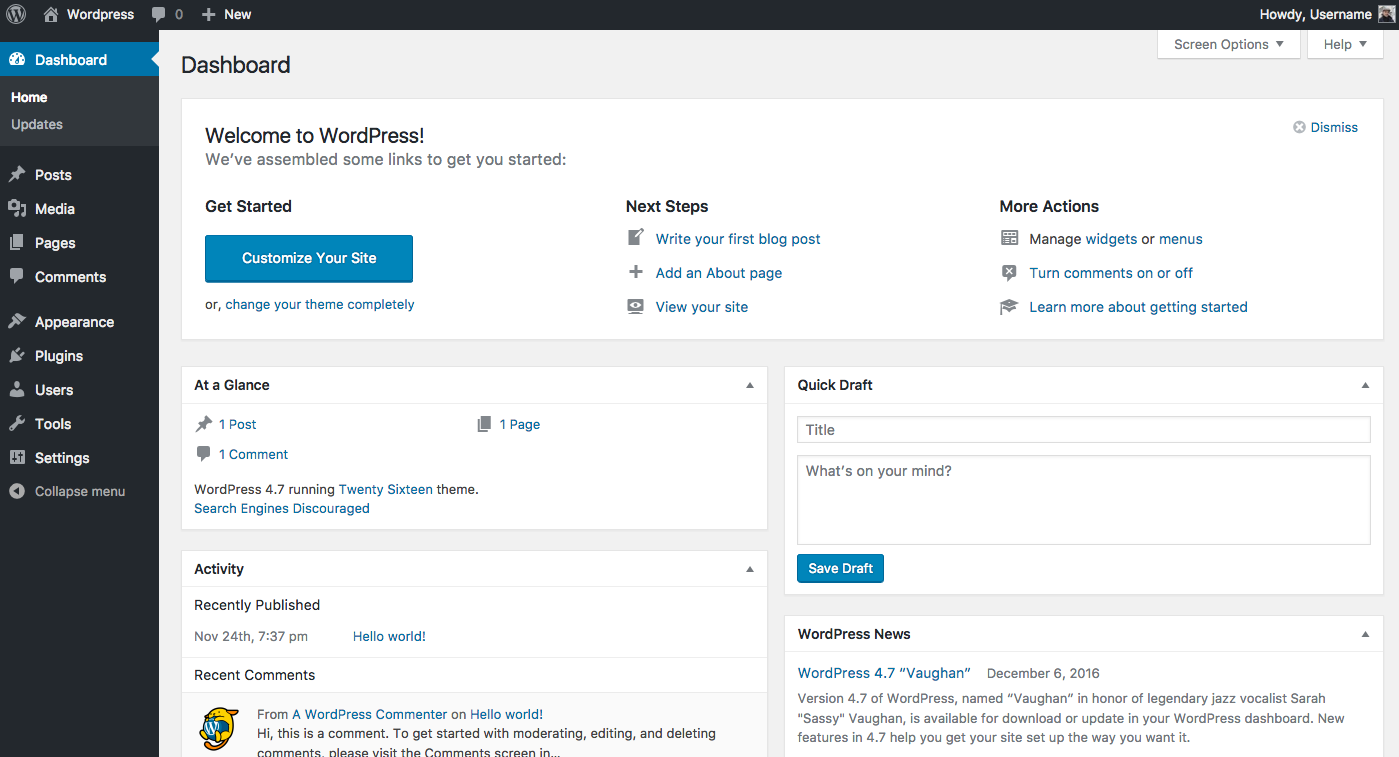
Let’s be honest: do you ever take the effort to look at all this every time you log in? I know I don’t. Fortunately, WordPress offers a default functionality to hide these metaboxes. On the top right of your screen, click on the ‘Screen Options’ button.

Untick the boxes of your choice to disbale the corresponding default metaboxes. You will now notice two placeholders, with dotted lines. Don’t worry, we will deal with these later. Now open your functions.php-file, we will add some extra code there. Do we have to stress this is a very important file for your WordPress installation, so be sure to make a back-up first!
Add the following code:
function disable_default_dashboard_widgets() {
remove_meta_box( 'dashboard_incoming_links', 'dashboard', 'normal' );
remove_meta_box( 'dashboard_plugins', 'dashboard', 'normal' );
remove_meta_box( 'dashboard_primary', 'dashboard', 'side' );
remove_meta_box( 'dashboard_secondary', 'dashboard', 'normal' );
remove_meta_box( 'dashboard_quick_press', 'dashboard', 'side' );
remove_meta_box( 'dashboard_recent_drafts', 'dashboard', 'side' );
remove_meta_box( 'dashboard_recent_comments', 'dashboard', 'normal' );
remove_meta_box( 'dashboard_right_now', 'dashboard', 'normal' );
remove_meta_box( 'dashboard_activity', 'dashboard', 'normal');//since 3.8
}
add_action('admin_init', 'disable_default_dashboard_widgets');
You will now notice all the metaboxes in your dashboard are gone, except the ‘Welcome’ metabox. Again, you can disable this one the easy way by unticking it in the Screen Options. If you want to get rid of it completely, add the following line of code to your functions.php:
remove_action('welcome_panel', 'wp_welcome_panel');
All the metaboxes on the dashboard are now gone. Also note, the don’t appear in the Screen Options tab either. They are fully disabled code-wise.
Add your own metabox to the WordPress dashboard
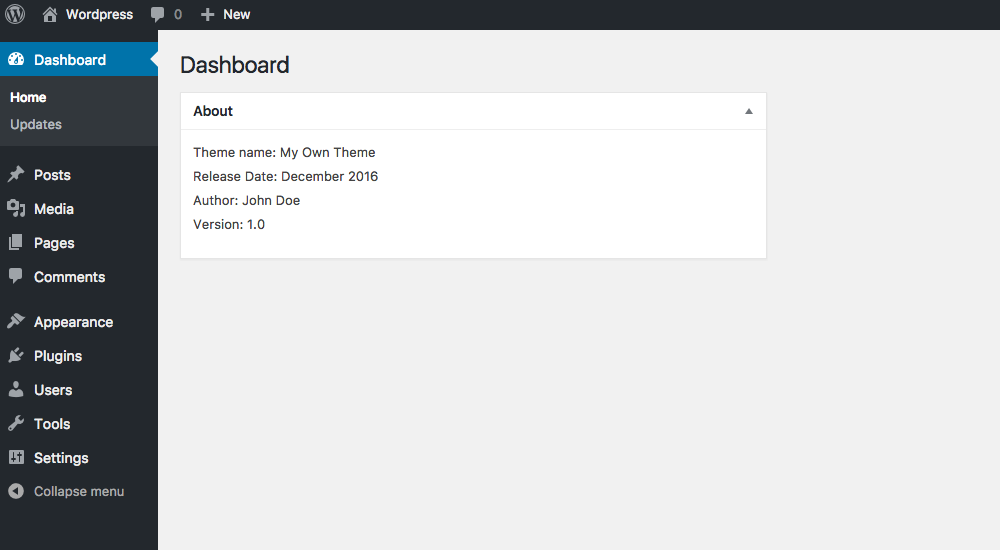
An empty dashboard is pretty dull too, so with the default metaboxes disabled, we have plenty of space to add our own metabox. This is again executed in your functions.php file:
function dashboard_widget_function() {
// Entering the text between the quotes
echo "
<div id=\"own_metabox\">
<ul>
<li>Theme name: My Own Theme</li>
<li>Release Date: December 2016</li>
<li>Author: John Doe</li>
<li>Version: 1.0</li>
</ul>
</div>
";
}
function twentysixteen_add_dashboard_widgets() {
wp_add_dashboard_widget('wp_dashboard_widget', 'About', 'dashboard_widget_function');
}
add_action('wp_dashboard_setup', 'twentysixteen_add_dashboard_widgets' );
Customizing the dashboard footer
A simple function can give us the ability to override the default footer in the back end, increasing the level of customization even more:
add_filter( 'admin_footer_text', 'admin_footer_text' );
function admin_footer_text( $default_text ) {
return '
}
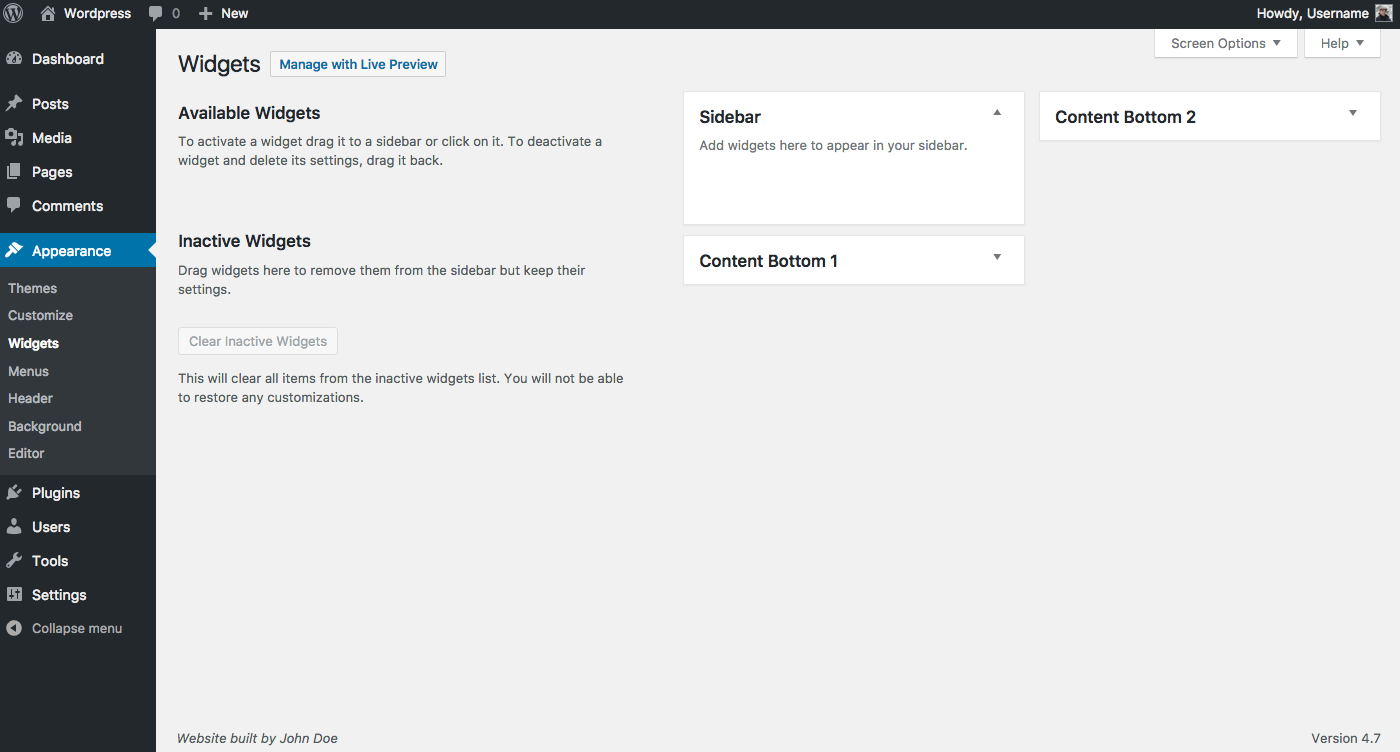
Eliminating the vast choice of available widgets
WordPress also provides a whole bunch of default widgets you can activate from the backend by dragging them in the sidebar or the footer. The same problem is manifested here: seldom you use all of these and the vast choice can confuse you or the customer you build the website for. So let’s get rid of these too by adding the following code to your functions.php file.
function unregister_default_wp_widgets() {
unregister_widget('WP_Widget_Pages');
unregister_widget('WP_Widget_Calendar');
unregister_widget('WP_Widget_Archives');
unregister_widget('WP_Widget_Links');
unregister_widget('WP_Widget_Meta');
unregister_widget('WP_Widget_Search');
unregister_widget('WP_Widget_Text');
unregister_widget('WP_Widget_Categories');
unregister_widget('WP_Widget_Recent_Posts');
unregister_widget('WP_Widget_Recent_Comments');
unregister_widget('WP_Widget_RSS');
unregister_widget('WP_Widget_Tag_Cloud');
unregister_widget('WP_Nav_Menu_Widget');
}
add_action('widgets_init', 'unregister_default_wp_widgets');
This will provide us with a nice and clean screen so nobody can drag unwanted widgets into parts of the frontend.
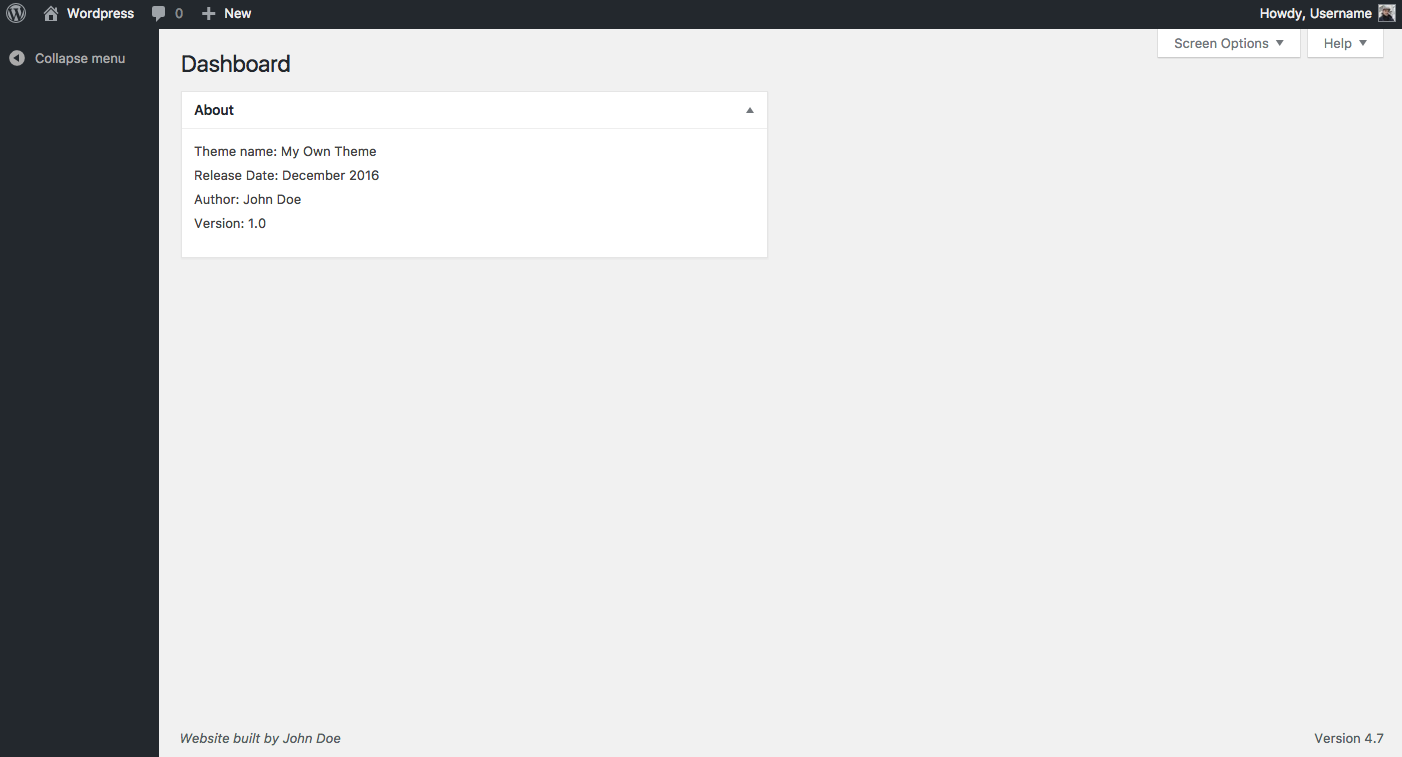
Disabling menu items
To illustrate the final step of customization, we will take this example to the extreme. Sometimes, you won’t need all the available menu items. For instance: when you build a simple website, without functionalities for a blog or a eguest book, the ‘posts’ menu is redundant. The next lines of code will disable all the available menu items form your back end. Obviously, as is the case with all the examples mentioned above, you can choose which lines of code you want to include so you can enable or disable the things you want.
This code also goes into functions.php:
function remove_menus(){
remove_menu_page( 'index.php' ); ⁄⁄Dashboard
remove_menu_page( 'jetpack' ); ⁄⁄Jetpack*
remove_menu_page( 'edit.php' ); ⁄⁄Posts
remove_menu_page( 'upload.php' ); ⁄⁄Media
remove_menu_page( 'edit.php?post_type=page' ); ⁄⁄Pages
remove_menu_page( 'edit-comments.php' ); ⁄⁄Comments
remove_menu_page( 'themes.php' ); ⁄⁄Appearance
remove_menu_page( 'plugins.php' ); ⁄⁄Plugins
remove_menu_page( 'users.php' ); ⁄⁄Users
remove_menu_page( 'tools.php' ); ⁄⁄Tools
remove_menu_page( 'options-general.php' ); ⁄⁄Settings
}
add_action( 'admin_menu', 'remove_menus' );
This code will make all menu items disappear.
So there you go. With a few lines of code, you are able to gain a lot of control on what kind of stuff you want to show in your WordPress backend, making life a lot easier for yourself or customers for whom you build a website.